 |
| Our baby announcement in cupcakes! |
Showing posts with label baking. Show all posts
Showing posts with label baking. Show all posts
Monday, July 28, 2014
Bun in the Oven
Food blogging has kind of taken a back seat this year, although I'm trying to put up at least one post a month. Well, it's all for a good cause because this MsChef has been up to mischief and....
... so it will be a whole different kind of blog come October - more puree than gourmet! But lots of fun to come!

Saturday, October 20, 2012
Anyone for Pimms Jam?

The jam makes way more than you need for the recipe, but it's also good on toast, Victoria Sponge and over ice cream, as it's more runny than store bought varieties. I also made mini bite sized scones to take to work for morning tea, but you can make them as large as you want depending on the cutter you use!
Pimms Jam (Based on a recipe I found on the ITV website)

225g cucumber
1kg jam sugar
rind of 1 lemon
rind of 1 orange
juice of 2 lemons
juice of 2 oranges
4 mint leaves
50 ml Pimms
Quarter the cucumbers, remove the seeds and slice into approx 1/4 cm slices;
Simmer in a little water for 10 mins or so, then remove from heat and drain;
Add all the remaining ingredients except Pimms and mint to a large saucepan and leave for 30-45 mins to mascerate;
Add the drained cucumber and bring to the boil for 10 -15 mins, breaking down the whole strawberries as they become tender, to your liking;
Leave jam mixture to cool for 10 -15 mins;
Add Pimms and finely sliced mint leaves and stir well;
Decant into sterilized jars and allow to set in the fridge.
Scones (based on a recipe from the trusty Readers Digest's The Cookery Year)

pinch of salt
1 teaspoon bicarbonate of soda
2 teaspoons cream of tartar
85g butter
120 ml water
120 ml milk
Preheat oven to 200C;
Sift dry ingredients together in a bowl;
Add butter and either rub in or use a mixer/food processor till the mixture resembles breadcrumbs;
Gradually add milk/water mixed together till it forms an elastic dough – you may not need all the milk/water mix;
Knead on the benchtop till smooth and roll out to approx. 1 cm thick;
Cut with pastry cutters to the desired size;
Lay quite close together on a preheated baking tray;
Brush with left over milk/water mixture;
Bake for 10 mins till risen and golden.
Assembly
Whip 150 ml cream till it forms stiff peaks
To assemble the scones, half each scone and spoon a little jam onto each half and then either pipe or quenelle a small dollup of cream on top! Enjoy with a glass of Pimms or a pot of tea!
Monday, June 18, 2012
Pumpkin Pie

 Jill's recipe calls for store bought shortcrust pastry. Whilst I'm a fan of this for making quick pies in my pie maker, today's pie for a Blog Hop called for a home-made pastry too. I also jazzed up the presentation with a blow torch to the marshmallows on top. Whilst this recipe is heavily based on Jill Dupleix's, I adapted it a little too, so here goes:
Pastry
200g Plain Flour
100g Chilled Butter
Pinch of salt
2-3 tablespoons of water
Filling
1 Butter nut pumpkin
3 eggs
60g fine breadcrumbs
200g brown sugar
1tsp cinnamon
1/2 tsp ground ginger
1/2 tsp all spice
1/4 tsp nutmeg
250ml evaporated milk
Marshmallows to decorate
- Preheat the Oven to 200C;
- Halve the pumpkin and lay seed side down on a greased baking tray. Cook until tender for approx 45 mins (fan forced);
- Meanwhile, prepare the pastry: In the food processor blitz flour, salt and butter till it resembles breadcrumbs; Add water to bind, 1 tbsp at a time. When it starts to form clumps turn it out onto a floured bench top and knead till smooth;
- Wrap in cling wrap and chill in the fridge for 30 mins;
- After chilling, roll out the pastry to around 3mm thick. Prick the base a few times with a fork and return to the fridge for around 20 mins to chill again (this prevents the pastry from shrinking in the oven);
- Line pastry case with the pastry, and then cover with baking paper and pastry weights;
- Remove pumpkin from the oven and turn off fan;
- Blind bake the pastry for around 10 mins, then remove weights and baking paper and bake for another 10-15 mins until browning;
- Meanwhile, remove 350g pulp from the baked pumpkin and set aside to cool;
- Into the food processor, add the three eggs and whizz gently to lightly beat;
- Add the pumpkin flesh and process till smooth;
- Pour in spices, sugar, breadcrumbs and a pinch of salt. Beat till combined;
- Finally add evaporated milk and blitz till all mixed in and smooth;
- Pour the mixture into a slightly cooled pastry case and return to oven for 25 mins or until the filling is set;
- Remove from oven to cool slightly (can be served warm);
- To serve, line white marshmallows around the outside of the pie. Blow torch to brown the marshmallows;
- Serve with vanilla ice cream or pouring cream.
Thanks as always to the #SABH team, especially the Kitchen Crusader, for hosting this month's Bloghop!
Sunday, June 10, 2012
Tiers of Joy
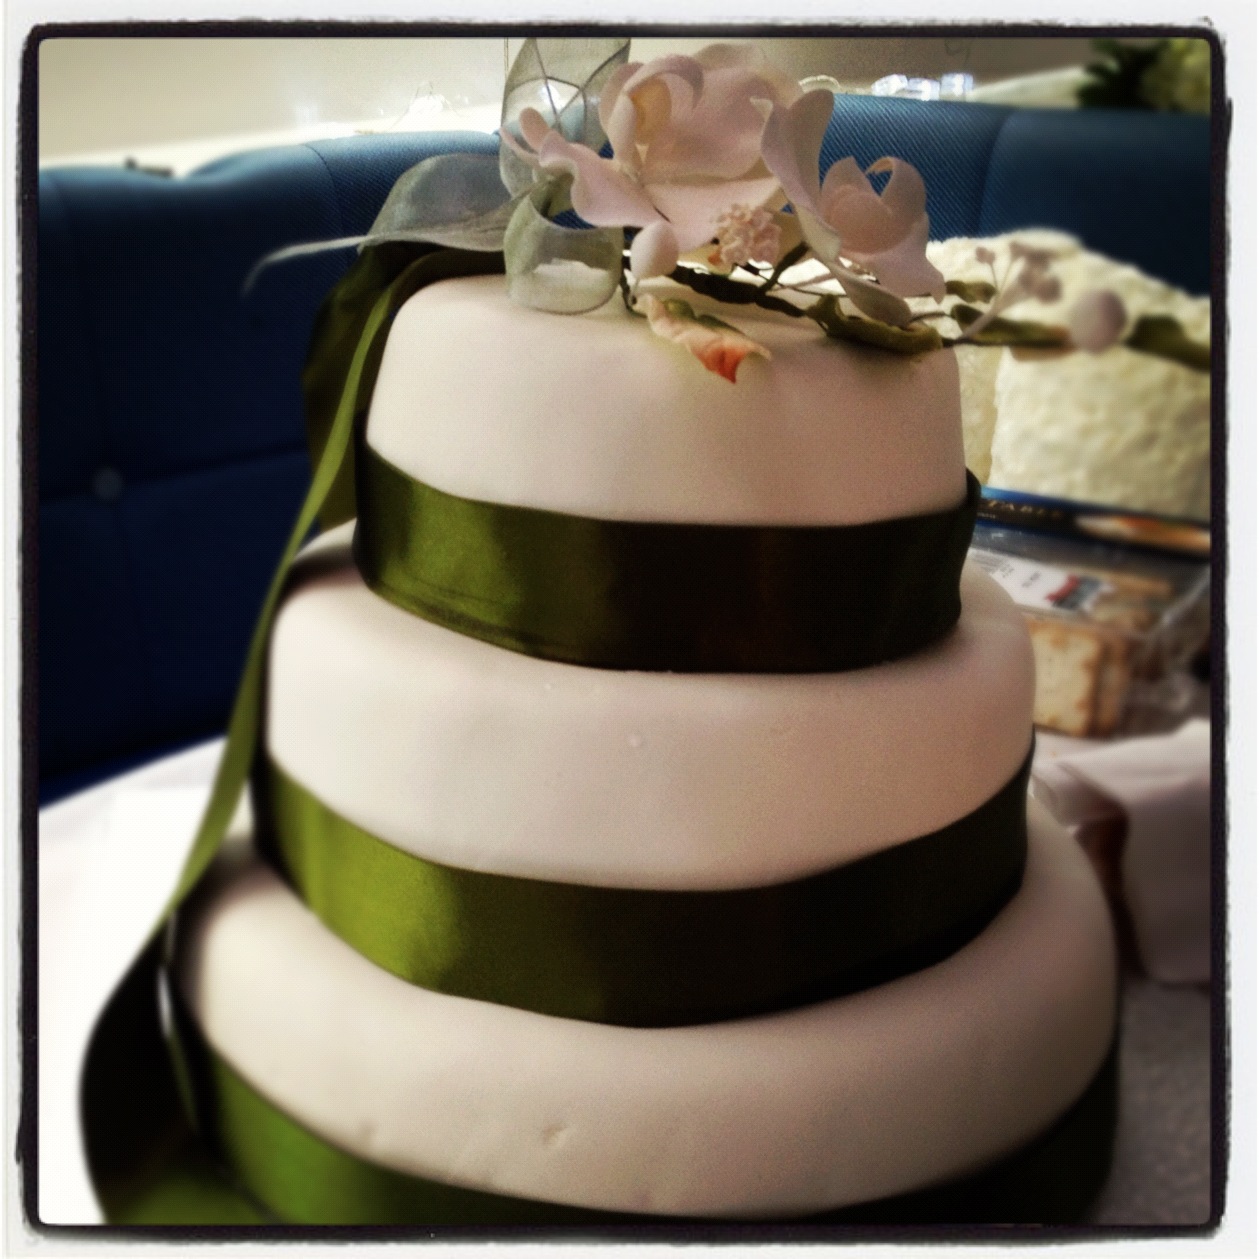
I was, of course, really excited to be able to give a three tiered cake as a gift, but it's not a small ask, especially because it would be my first time making a gluten free cake and no pressure, it's just the most important cake in a girls life! Luckily, apart from the gluten free request, the bride was quite relaxed about how it could be, but I had more expectations on myself to make it as good as it could be.
It actually wasn't the first wedding cake I've made, but unlike riding a bike, it's as daunting the second as the first time! The one thing that did fill us with confidence was that in the test version of the Gluten-free rich fruit cake turned out beautifully and we knew that the Marshmallow fondant that we used in the first wedding cake we made a few years ago would be a real winner!
When it came to baking and decorating the cake it was hectic but fun (apart from the beginning of the icing when my hubbie thought the marshmallow would never become unstuck from his hands!) and the cake, although not perfectly evenly shaped, went down a treat.
I felt very honoured to be able to be part of my friends' special day and delighted to kick off their marital bliss with a moist, brandy laced fruit cake!
Wednesday, April 18, 2012
Getting Lemon
 |
| Lemon & Lemon Myrtle Macarons |
Well today I was feeling a little "lemon" for the Sweet Adventures Blog Hop - Lemons, hosted by Le Delicieux. Inspired by visiting Zumbo's patisserie the other week, I'd made my mind up a few weeks ago that I was going to try macarons for the next hop (just as well it wasn't a pudding hop!) and was excited to see the lemon theme.
As it was my first time making macarons, I followed a recipe but added a little Australian twist, so I'm happy to share my Lemon & Lemon Myrtle Macarons (based on the exploding lemon macaron recipe on the BBC website):
Lemon & Lemon Myrtle Macarons
Ingredients (makes 40 - 20 macaron sandwiches)
 Macarons
4 egg whites (at room temperature)
80g caster sugar
110g almond meal
220g icing sugar
zest of 2 lemons (keep 1/2 a lemon for the juice in in the butter cream)
1/2 teaspoon of lemon myrtle powder
a few drops of yellow food colouring
Lemon & lemon myrtle butter cream
125g butter
75g icing sugar
juice of 1/2 a lemon
1/2 teaspoon of lemon myrtle power
Method

Grease and line 2 baking trays with baking paper
Beat the egg whites till they form stiff peaks
Gradually add the caster sugar and beat till glossy
Sieve the almond meal and icing sugar
Add the lemon zest
Fold a little of the egg white mixture into the dry mixture
Add a few drops of yellow food colouring and continue folding the egg white mixture in, till all combined
Fill a piping bag with the macaron mix and pipe 40 small 1.5cm diameter circles onto the trays
Leave them to rest at room temperature for 20 mins
Preheat the oven to 170°C
When the macarons are no longer sticky to touch, put them in the oven for 10 mins, switching the trays after 5 mins
When the macarons are just crisp remove them from the oven
For the Lemon Butter Cream
Squeeze the 1/2 lemon and add lemon myrtle powder to the juice, and allow to infuse
Cream the butter
Add the icing sugar and beat till combined
Add 2 tablespoons of the juice to butter cream and blend
Manage the consistency to a smooth spreadable paste by balancing the juice with icing sugar (add more juice if the butter cream is too stiff, and add a little icing sugar if it's too wet
When the macarons are cool, spread a generous layer of butter over one macaron and sandwich another on top. Serve and enjoy :-)
Sunday, December 4, 2011
If Music be the Food of Love...
 |
| Chocolate Gunge |
...We'd better feed the musicians!
In my offline life I play the violin in the Eastern Sydney Chamber Orchestra. Every concert the orchestra members pitch in a contribution to the afternoon tea for the audience to look forward to during the first half and to keep the sugar rush and adrenalin of the players high to see them through till the end of the concert!
This time I decided to bake an old favourite family recipe originally passed to us from a great family friend. It is a simple but amazing moreish kid friendly snack called Chocolate Gunge! Gooey and chocolatey, it attracted audience and orchestra members young and old!
When I say "recipe" I mean I kinda remember from my childhood what we put in and how we made it, so to help me commit it to memory for next time and to give a quick, easy and cheap ($7.36 for the whole lot) winner dish for the next kids party, or orchestra afternoon tea, I am sharing it here!

Chocolate Gunge
250g butter ($1.55)
395g can of condensed milk - ($1.79)
Cocoa powder (in the pantry)
250g scotch fingers - ($0.95)
250g milk arrowroot - ($1.09)
375g Milk chocolate - ($1.92)
- Melt butter in a large saucepan. Remove from heat;
- Add condensed milk and coca powder and stir well;
- Crush the biscuits with a rolling pin or in a food processor till broken into small (approx 1cm pieces) but not crumbs;
- Add biscuits to cocoa mixture and mix well;
- Turn out into a rectangular baking tray;
- Chill;
- Meanwhile, melt the milk chocolate in a double boiler - a heat proof bowl sitting on top of a saucepan of water (but not touching the water) on the boil;
- When biscuits are chilled, pour over the melted chocolate;
- Spread the chocolate evenly over the biscuit and then make a swirly pattern using a fork;
- Return to the fridge overnight or till the chocolate is solid;
- Slice into 2cm square pieces and serve.

Don't expect it to last long!
Sunday, August 28, 2011
Choc and Cheese

Our current Japanese homestay guest loves muffins, so before we start our big health kick, I thought I'd try my hand at some baking. Apart from the odd birthday cake, I'm not really a huge baker. I definitely don't have the perfectionism required for beautiful baked goods, so my attempts are of the rustic variety!
We were going on a road trip so I decided to bake some savoury broccoli, ham and cheese muffins, a recipe I found on the internet, as well as some sweet cappuccino and white chocolate muffins from my breakfast bible, the Marie Claire Breakfast cookbook. The techniques and ingredients for both sets of muffins were completely different, leading to two contrasting but equally tasty outcomes.
The savoury muffins were delicious. I substituted the plain flour for wholemeal flour in an effort be a bit healthier. It was a really interesting use of broccoli to pack them with goodness! There was a lot more egg in these muffins, and the lightness came from whisking up eggs. They were more akin to frittata than a cake, but that worked really well with the savoury ingredients and made them less heavy and a great breakfast on the road snack.
The sweet muffins were light and fluffy from the buttermilk added in these. The coffee flavour was subtle and balanced the sweetness of the chocolate. There were however, some hitches along the way! The muffins were prepared wrapped in baking paper lined ramekins. Whilst they were moist and tasted great, they were quite a strange shape given some of my inconsistent baking paper cylinders. The white chocolate chips kind of sunk to the bottom of the muffins too! And they certainly didn't look much like the picture.
All in all though, my efforts were pretty good and those tucking in came back for seconds reinforcing that they were actually very tasty!
Subscribe to:
Posts (Atom)
